Showing posts with label Finish-Along. Show all posts

Friday, March 9, 2012

March Madness

The goal in February was to finish Poppy's quilt, and you already know about that. I managed to pull off a couple other finishes, too.

These are the blocks I made for my fellow bees in this round of the 3x6 bee.
It's intimidating to make something for people I don't know. It helps when they're chatty on the discussion threads. I study their request forms and what they've made on Flickr or on their blogs, then I start pulling fabrics from my stash in their colors. Then, the fun of creating takes over, and I try out different combinations until I'm happy with the product. There are lots of discarded pieces that end up in my scrap organizer!
Now I look forward to getting squishy envelopes in the mail with blocks from around the world. Our hive has a pinwheel theme, so all the blocks are going to have a sense of movement, and should be fun to put together!

I also made these cute booties for Maggie's baby shower. Handmade, stylish, cute; I knew she'd love them.

Now it's March, and the first thing I want to finish is for another swap.
Armchair Pincushion
Hedgehog embroidery: Stick it Here
This time it's a secret swap; I'm making a requested item in requested colors for someone I don't know. I can gather clues about her likes and dislikes, and she says she likes bright colors. Her photo mosaic, though, listed these specific colors.
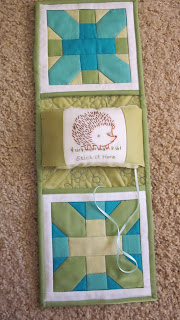
Popular + and x blocks for pockets
I was torn between the sea glass colors pulling me toward something elegant, and the requested armchair pin cushion pulling me toward something cute.

Grippy asterisks on back
And I wonder if I violated the spirit of the "For the Love of Solids" theme by embroidering, and quilting flowers, and using a print in my secondary item.

Cute little thread catcher with
Lizzie House hedgehogs
Finally, I say enough's enough, it's cute, it's done. I'll add a few goodies to the box: little scissors tied to that ribbon, a measuring tape, cute butterfly pins for the pincushion. And a See's lollipop, because that will sweeten the deal.


Friday, February 17, 2012

Who's Afraid of the Big Pink Quilt?


Poppy's quilt is finished, and on its way to Pittsburgh!
**** If you'd like to see lots of pictures of individual quilt blocks and quilting details, take a look here.****

A year ago I joined the 3x6 Mini Bee, an on-line group that makes quilt blocks for each other. It's a fun way to try sewing blocks using different color combinations, and to make friends with people around the world. I started receiving quilt blocks in pink and purple and rainbow colors, featuring prints and motifs a little girl would appreciate.

Finally, with Poppy's birthday approaching, it's time to turn these blocks into a quilt! 

After conforming all the blocks to the same size, and choosing a sashing to pull them together, I still had to overcome the obstacle of size: I really wasn't looking forward to wrestling a twin size, flannel-backed quilt under my machine to quilt it the way I envisioned. I did some research, and talked to the local quilt guru, and came up with a plan to use a form of quilt-as-you-go.


I'm working with a paper model here; I didn't take photos until I was well into the project, and a smaller model might help communicate the big idea. 

I didn't completely sew the quilt top together; I left it in three sections, each section had two rows of five blocks, with sashing in between.
I made the whole backing for the quilt.
Use your imagination here.
Each section on the left is ten 12" blocks with sashing.
The yellow is a 70"x96" pieced backing.


First the middle section of the quilt top was plunked down onto the middle of the huge backing, with a section of batting in between, just enough to fit, with an inch or two sticking out all around. Pin basted.
I machine quilted each block, first using stitch-in-the-ditch along the sashing and on all the straight lines in the blocks.
Remember, this paper model represents  a 30'x70" quilt section!
Then I got out my Free Motion Quilting foot, and had fun experimenting with different shapes. All the white background spaces are FMQ in a meandering stitch, and in the colored areas I quilted flowers and stars and circles and feathers and loops and swirls! I was working on the middle of the quilt, but with only the backing rolled up in the harp of the sewing machine, without the bulk of the remaining quilt top and batting.
When the center section was thoroughly quilted, I added the bottom section and quilted it, then the top section. Let me show you how I added the other sections!

You can see the quilt-in-progress spread out on my ping pong table, the backing for the upper section hanging over the edge. The quilted middle section is spread out, and rolled up in the background is the quilted lower section of the quilt.
I'm pinning the next section of the quilt top, right sides together, to the already quilted center section. 
Remember, the quilting has cinched up the already quilted layers,
so stretch them out so the new top section goes on smoothly.
Match up the sashing!


Then I take it to the machine, and stitch through all layers: new section of quilt top (face down), middle section of quilt top, middle section of batting, backing.
Notice the backing rolled up on the right.
Then back to the ping pong table, where the backing is stretched out and taped down, and you can see the quilt top section ready to be folded down.

Batting is laid out on the backing, ready to go under the upper quilt section.
The new batting is attached to the edge of the middle section batting. It's okay for the edges to overlap a bit, unless you have especially bulky batting. Just whipstitch the batting edges together.

Smooth the new quilt top section over the batting. You can't tell here where the top is joined except that the blocks in the top right corner of the pic have already been quilted, and the two rows of block in the foreground have not.

Pin baste or spray baste the layers together, then quilt as desired. 
I used the same method to add sashing to the sides of the quilt, and to add borders to the top and bottom ends. 

The point of this technique is that with a full size backing, I could work on a section of quilting at a time without manipulating three heavy, bulky layers all the time, and there are no awkward joins that have to be covered, hand-stitched, or disguised in any way. No shoulder pain, no sewing machine getting pushed around on the table!


**** If you'd like to see lots of pictures of individual quilt blocks and quilting details, take a look here.****


Friday, January 6, 2012

Good intentions here!

Quilter in the Gap has created an on-line quilting group whose goal is to encourage finishing projects that languish in closets, bins, piles. I've got some of those! Along with being part of a group encouraging each other to finish some of those UFOs (unfinished objects) and WIPs (works in progress), there's a chance to win prizes! Cool!
The projects I intend to finish this quarter are:

Turn these blocks from the 3x6 Sampler Bee into a twin size quilt for Poppy.

Make something I'm happy to send to my swap partner in the For the Love of Solids swap. Here's my inspiration mosaic, to give my partner ideas about what I like.


I'm going to pull this forgotten piece out of the closet and finish it, and find a home for it.

We'll see if I can pull it off!